Click the map for a larger version
Both the map and the text description are provided graciously by Christian Okane. Original Sketch was done by Bryan Derksen.
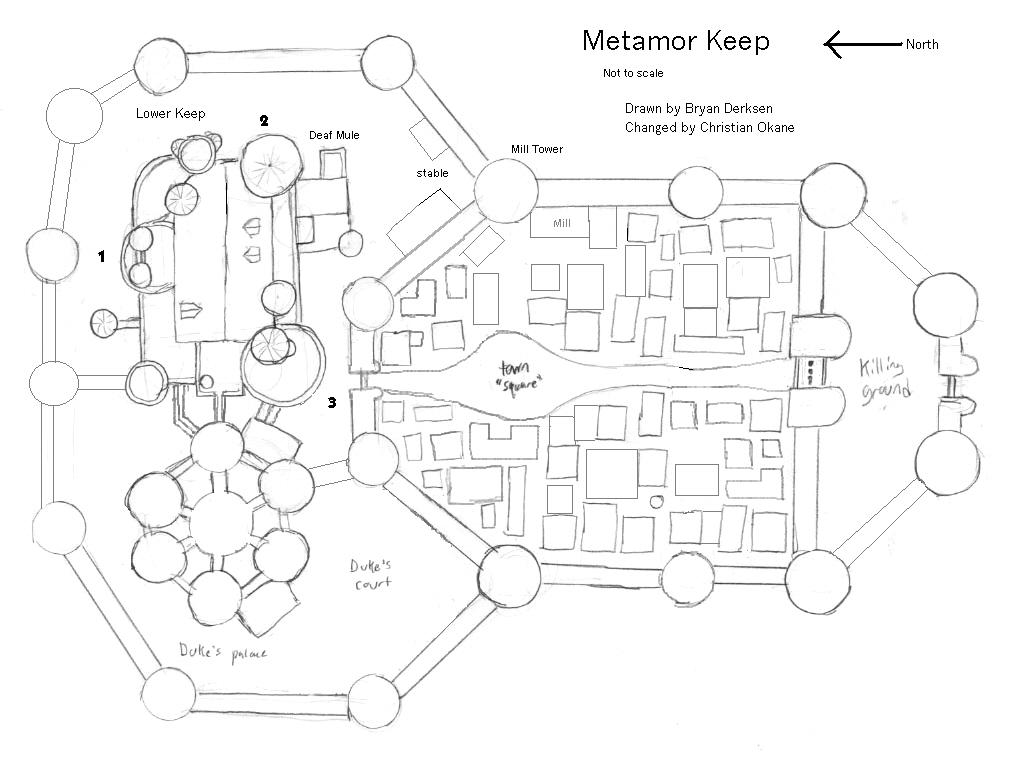
Note: That there are discrepancies with this map and some of the stories already written. The problem was that there are discrepancies between the various stories. The location of the Mule is the worst; some place it in the keep, others place it in a separate building near the keep (mostly the latter). So this is an attempt to reconcile all sources into something cohesive.
Most of the actual layout (excluding the keep itself) is based on my knowledge of castle architecture, especially the castles built in the Holy Land during the Crusades. A lot information came from stories already written and feedback that I've received. A lot of common sense was also used.
A note of words and definitions: most of the names were assigned by me for convenience, so if a better one comes up I'll use it.
These 2 names describe different things. Metamor Keep refers to the whole castle (basically everything within the curtain wall). The Keep refers to the structure with the "Variable geometry" whose interior won't be mapped, areas 6 and 7 (described below).
The keep is located in a pass between 2 impassable mountain ranges. At its widest it is about 10 miles across. At it's narrowest its less than a 1 mile wide. The valley is filled with various farms, towns, villages, and forests. North of the keep the valley gets more and more desolate and wild, until at it's northern end its totally wild and uninhabited. The keep is located at the narrowest part of the valley, roughly at the mid-point, where it narrows to less than a mile wide. The pass is kept closed to the lutins by patrols sent from the keep. The entire valley is heavily patrolled, by foot, cavalry, and flying. Nasoj could besiege the keep and then just bypass it and march south, but that is too dangerous. If the defenders managed to break the siege his army would then be cut off from it's northern supply base, and be trapped in the south. With no place to retreat to and no supplies they would be wiped out in short order. To successfully invade the south, he has to take Metamor Keep. It's just too dangerous to bypass it.
Metamor Keep's primary defense against a northern assault is in extensive patrols of the mountain pass and the surrounding lands. In order to assist with the patrols, a series of fortified positions and watchposts have been built within the Keep's valley. These buildings act as lookouts, signal towers, and provide forward positions from which to combat an invading army. As well, they also provide support to the roving patrols in the form of rations, horses, and updated intelligence.
Most of the outposts were constructed after Nasoj's invasion in 699CR (The year of the Battle of the Three Gates). Duke Thomas ordered the construction and refurbishment of many of these outposts to provide a better defense against the Lutin hordes.
Surrounding the lands around Metamor Keep are approximately a dozen fortified buildings that act as a vanguard to combat any force trying to take the Keep. Most of these outposts are located to the north, watching activity in the Giantdowns. Some forts do exist to the south, looking after incoming caravans and protecting the Keep's flanks.
For the most part, a fort is garrisoned by one of the Keep's regular companies, with companies rotating between duty at a fort and duty at the Keep. These forts consist of stone towers that are left over relics of the Suileman Empire, and after centuries of abandonment have been refurbished. These are small castles that usually consist of only a single tower surrounded by a small wall and a ditch.
Defenses at the towers are fairly simple, mostly consisting of trenches and walls. Only the very largest towers are large enough to support large weapons such as catapults, ballistas or trebuchets.
Many of the larger castles in the valley are the manor-houses for the various nobles. Castles that are owned by nobles are not manned by members of the Metamor army without the permission of both the Lord of the Castle and Duke Thomas. Instead, each lord maintains a small private guard. These lords are under the protection of Metamor and can call on the Duke for help when needed. In return, they must assist Metamor in patrol duties on their land, and stand with Duke Thomas in the event of an invasion from the Giantdowns.
In order to allow for quick communications between outforts, patrols and Metamor Keep, a series of signal towers were built surrounding the keep. Between the outforts and Metamor run lines of these towers, each within visual range of at least two towers or forts.
Each tower is manned by a small crew of between 2 and 5 people, usually on a weekly rotation. This duty is often given to those who do not wish to serve Metamor by going on patrol, or to members of the Keep's military that have lost a limb or who are otherwise unfit for combat due to an injury. Duties at the towers include relaying messages from other towers, watching for large troop movements, collecting reports from passing patrols, and to deliver new orders and updated intelligence to the patrols.
All of the larger outforts have a signaling tower. As well, there is a signal station located atop the central tower of the Duke's Castle. This allows for quick communications between field forces and the Commanders and the Duke back at Metamor.
Built on high ground such as a hill or ridge line, the signal towers have very little in the way of defenses and rely mostly on natural protection provided by the topography. If an invading army has moved close to a signal tower, the crew evacuates to the nearest outfort or to Metamor. The towers are made of wood, consisting of an elevated platform above the forest canopy. On the platform is a small building that acts as the crews living area and work station. The shack has large windows and offers a uninterrupted view of the surrounding landscape. A smaller platform on the roof of the building holds the signaling lantern mounted on a swivel and tripod.
The tower's defenses consist of a small palisade around the base, metal sheaths around the tower's leg to prevent burning or cutting of the support legs. In order to offer some additional security to the crew of the tower, the ladder can be brought up to prevent people from sneaking up.
The signaling lantern is a large shuttered lantern that is used to send messages with a flash code. A lever on the side operates the shutter, letting the light shine when open. For convenience and safety the lanterns are fueled with a special oil that burns brightly, but is relatively cool. During the day, when the lantern may be hard to see, other signaling methods maybe used, including smoke signals, bells and semaphore flags.
Major signal towers, such as the ones at the larger forts, may also have Carrier Pigeons. These birds are only useful for sending messages to and from Metamor Keep since that is where the birds are bred, but can usually get a message through quicker and more securely then the signals.
Metamor Keep is located on a south to north running ridge. The ridge rises higher on the north end. The highest point is the Dukes palace. The outer curtain wall surrounds the entire ridge about 50 yards up the slope. The slope below the walls is very sharp and impossible to climb without a rope. Nothing is allowed to grow there higher than ankle height. Anything higher could conceal an attacker.
Metamor keep is divided into several different courtyards, or wards by cross walls that run completely across from east to west. The layout of these courtyards is as follows running from south to north (going uphill).
Note to the Confused: sites 6 and 7 both make up The Keep. I have described them separately but they are less than 20'feet apart and are interconnected by countless walls, bridges, promenades and rooms. They are one structure and both have the variable geometry. A person can pass from one to the other and not realize it until they find a door or window and look out. They are two parts of one building.
Why the two parts of The Keep? The main cause was the already published stories describe two different types of Keep, one massive and brooding, and one light and airy. Another reason was feedback, after talking to several people the layout seemed to just evolve. Another (personal) reason is the contrast between the two different elements sounds great.
What's the difference between the town in the castle (area 4) and the town outside the keep (area 10). Area 4 is involved with the castles upkeep. The keep bakery, the Dukes Jeweler, the Mill, the blacksmith. Area 10 is an independent town (with a mayor) that grew up around the marketplace. Most of the people who guard the caravans stay here, too frightened of the curse to get closer. Life here is a lot less controlled than in the castle, but at a cost; protection. This town was almost completely leveled during the siege.
Defending the keep from attack and infiltration is a difficult task. The walls and towers are constantly patrolled. In each tower are archers and infantry.
At the base of the ridge running all the way around is a ditch. This ditch is 50' deep and 30' wide. It has been cut into the rock of the ridge itself. Both walls have been polished smooth to make climbing difficult.
Catapults, ballistas and trebuchets - These siege weapons are scattered throughout the castle. Some of the outer wall towers have a ballista or a small catapult. These are meant to help the tower beat off a ground attack. They're also used to kill flyers or at least keep them at a distance.
Trebuchets- These are the keep's heavy artillery. Slow to load and shoot they are large, powerful, and have a astounding range. One shot from a trebuchet will kill or wound a giant at 1000'. These are too big and heavy to fit in most buildings, although some of the larger buildings hold them. In a siege several would be set up in the various courtyards. These are kept disassembled in the Lower keep storerooms and taken out in an emergency. Each individual trebuchet has a name: Ravager, Answerer, War wolf, etc...
The Lower keep - holds several catapults, and ballistas. It even has 2 trebuchets on the roof.
The Duke's Palace - In each spire on or near the roof are several catapults or ballistas. In the Central spire is also a trebuchet. These weapons help the keep's flying defenders dominate the air over the keep.
The great bell is used to mark the changing of the guard, breakfast lunch and dinner being served, and important events. It's also used to sound the alarm in times of emergency. Its tolling can be heard almost everywhere in the castle. The emergency alarm (continuous ringing) is guaranteed to bring everybody running.
This section describes individual rooms and areas of Metamor Keep.
The following locations haven't been set in place yet